How to Create a Shared Network Folder: A Step-by-Step Guide
Whether you’re working from home, running a small business, or managing files in an office environment, sharing folders over a network can make file access and collaboration a lot smoother. Instead of emailing files back and forth or carrying USB drives, a shared network folder lets multiple users access, modify, and save files in one centralized location.
In this blog, we’ll walk you through how to create a shared folder on a Windows PC that can be accessed by others on your local network. We’ll also touch on how to do it on a Mac and mention best practices for security.
What You’ll Need
- A computer connected to a local network (Wi-Fi or Ethernet)
- Another device on the same network (for testing access)
- Basic knowledge of your system’s file explorer and settings
🖥 How to Create a Shared Folder on Windows (10 or 11)
🔹 Step 1: Create or Choose the Folder
- Open File Explorer.
- Go to or create the folder you want to share (e.g.,
C:\Users\YourName\Documents\TeamFiles).
🔹 Step 2: Enable Sharing
- Right-click the folder and select Properties.
- Go to the Sharing tab.
- Click Share.
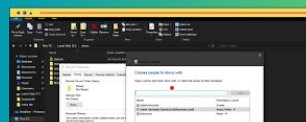
🔹 Step 3: Choose Who to Share With
- In the “Network access” window, select the user or group (e.g., “Everyone”).
- Set their permission level:
- Read: They can view files.
- Read/Write: They can view, edit, and delete files.
- Click Share, then Done.
💡 Tip: You can also create new local users for more control and tracking.
🔹 Step 4: Advanced Sharing (Optional but Recommended)
- Back in the Properties > Sharing tab, click Advanced Sharing.
- Check Share this folder.
- Click Permissions and adjust access control for “Everyone” or specific users.
- Click OK to save changes.
🔹 Step 5: Get the Network Path
You’ll see the network path (e.g., \\YourPCName\TeamFiles). Write this down or copy it—you’ll need it for accessing the folder from other devices.
🔹 Step 6: Allow Folder Access Through Firewall
- Open Control Panel > System and Security > Windows Defender Firewall.
- Click Allow an app or feature through Windows Defender Firewall.
- Make sure File and Printer Sharing is checked for Private networks.
🔹 Step 7: Access the Shared Folder from Another Device
On another computer connected to the same network:
- Open File Explorer.
- In the address bar, type the network path (e.g.,
\\YourPCName\TeamFiles) and press Enter. - You may be prompted to enter credentials (username/password of the host computer).
✅ Success! You can now access shared files.
How to Create a Shared Folder on macOS
Step-by-Step:
- Go to System Settings > General > Sharing.
- Enable File Sharing.
- Click the “+” to add a folder you want to share.
- Set user permissions on the right.
- Click Options and check “Share files and folders using SMB.”
- Make sure the user accounts are selected, and set passwords if needed.
Access from Windows: Use the path
\\YourMacName\SharedFolderName.
Security Tips for Shared Folders
- Don’t share system folders or sensitive directories.
- Always set passwords for shared folders or network users.
- Avoid sharing with “Everyone” unless necessary.
- Disable sharing when it’s no longer needed.
- Use a Private network, not Public, to enable safe sharing.
Bonus: Sharing Over the Internet (Advanced)
While this guide focuses on local networks, you can also share folders over the internet using:
- Cloud storage (Google Drive, Dropbox, OneDrive)
- Remote desktop tools
- NAS (Network Attached Storage)
- VPN with shared folder mapping
These methods require more setup but offer global access and higher flexibility.
🧾 Conclusion
Creating a shared network folder is a simple but powerful tool for teamwork, file organization, and convenience. Whether in an office, a classroom, or your home, mastering this skill can save time and boost productivity.
So, go ahead—create that shared folder and make file chaos a thing of the past.